Getting Started with Inscribe Webhooks
Webhooks allow you to receive notifications for Inscribe's fraud and verification results in real-time at a URL that you specify. This is the preferred method for high-volume processing of notifications and allows you to programmatically hook into the lifecycle of your documents and customers in Inscribe to act on any of the results.
Creating a Webhook
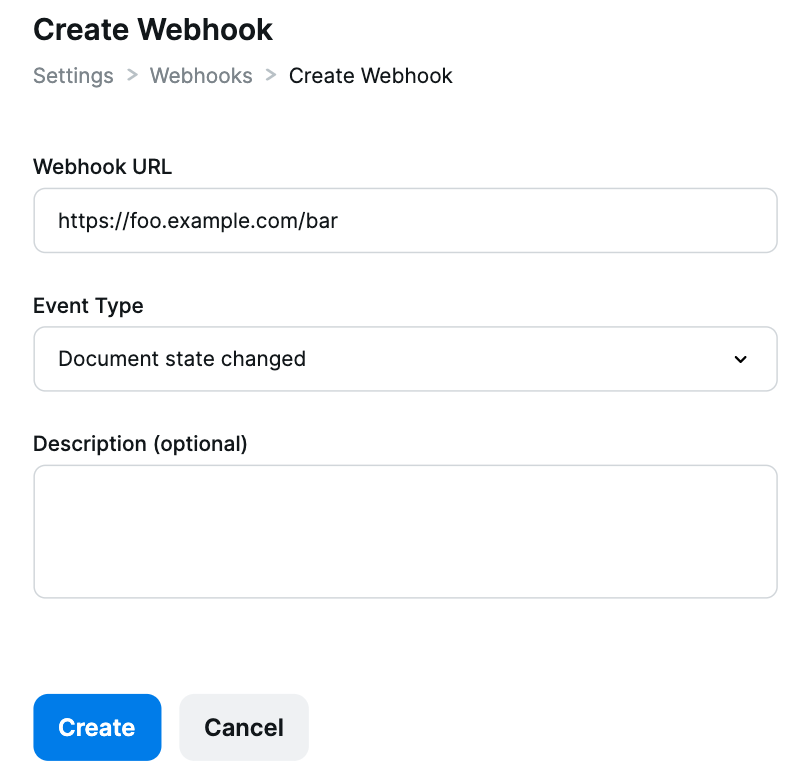
The webhooks settings page provides an interface for registering and editing your webhooks. Only admins within your Inscribe organization will have permission to view and manage webhooks.
RedirectsIf your webhook URL responds with a redirect to a different URL, Inscribe will not follow it. You need to provide the correct URL which will ingest the data.

Create Webhook page
It is important that you ensure that the payload you are receiving on your webhook comes from Inscribe. Details on securing your webhooks are provided below in the "Securing your Webhooks" section.
Editing your Webhook
Using the webhooks settings page you can edit the URL and type of your webhook.
Webhook Types
We currently support three different types of webhooks.
| Document state changed |
|---|
| This webhook type is the default for newly created webhooks. It will send a request to your chosen URL whenever the state of a document changes. The body of the request will contain a document result object in the same format as the "Get Document Results" API. |
| Document state changed minimal |
|---|
| This webhook type provides a subset of the "Document state changed" webhook event. It will send a request to your chosen URL when Inscribe's document processing is complete. As a subset of the request above, this event contains: Document ID, Document UUID, Customer UUID, and Document State. |
Document progress |
|---|
This webhook type can be configured to send multiple requests at different stages as the document progresses along the processing pipeline. The available stages, in order, are:
The body of the request will include a field called |
| Customer Processed |
|---|
| This webhook will send a request to your chosen URL whenever the customer data has finished processing. The body of the request will contain a Customer result object in the same format as the "Get Customer Results" API. It contains a complete review of the customer and all their documents, including fraud and compliance insights when available. |
| Collect Session Completed |
|---|
| This webhook type will send on successful completion of a collect session by your customer. The body of the request will contain a collect session object in the same format as the "Get Collect Session" AP |
| Customer Approval Status Changed |
|---|
| This webhook type will send when a customer's approval status is changed to either "Approved" or "Rejected". The body of the request will contain the relevant customer object in the same format as the "Get Customer" API. |
Securing your Webhooks
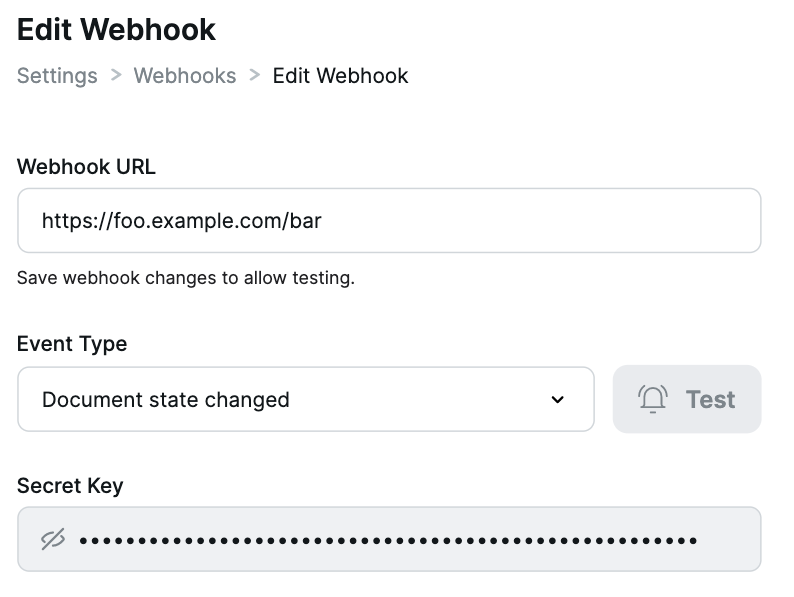
The nature of webhook delivery requires that the URL that will receive the requests is publicly accessible over the internet. When you have set up your webhooks, for security purposes you will want to verify that incoming requests are coming from Inscribe and not any other potentially malicious 3rd-party that has the URL. In order to accomplish this, we assign a unique secret key to each webhook you create. These are viewable for each webhook on initial creation, and on the Edit Webhook page.

Secret Key as shown on the Edit Webhook page
Inscribe uses this secret key to create a hash signature with each payload, which we send as a header, called X-INSCRIBE-SIGNATURE.
In order to validate that the request came from Inscribe, you can compute your own signature with the secret key and the webhook request body. Inscribe uses a HMAC hexdigest to compute the signature with SHA256. Below is an example of a function in Python that can verify an incoming request body string and signature using your secret.
import hashlib
import hmac


def signature_is_valid(request_body_string, secret, request_signature):
    computed_signature = hmac.new(
        secret.encode("utf-8"),
        request_body_string,
        hashlib.sha256,
    ).hexdigest()

    return hmac.compare_digest(computed_signature, request_signature)
Distinguishing Test Webhooks
The HTTP header X-INSCRIBE-TEST-MODE is included in all outgoing webhooks. The possible values for this header are the strings "true" and "false". The header value will be "true" for any webhooks that your system receives that are as a result of using the webhook test functionality on the webhooks settings page. The header value will be "false" for any webhooks that your system receives that are as a result of normal operation of Inscribe such as customer documents changing state or collect sessions being completed. This allows you to have different code paths in your system to handle test webhooks or ignore them if you choose.
Testing your Webhooks
In order to get an idea of how Inscribe webhooks work and what the shape of the incoming data looks like it is often a good idea to set up a test server and inspect the requests that come into it. This can also be useful to verify your implementation of the webhook signature check works as expected or to test integration of webhooks into your application. Setting up a local server to receive webhooks from Inscribe can be accomplished with tools like ngrok which allow you to set up a public URL that tunnels to a server running on your local computer.
The first step is to run your test server. For this example we're going to use the following Python code using the Flask web framework. This example server uses the function we defined before to verify the signature of incoming webhook payloads.
import hashlib
import hmac
from flask import Flask, request


SECRET = "YOUR_WEBHOOK_SECRET_HERE"

app = Flask(__name__)


def signature_is_valid(request_body_string, secret, request_signature):
    computed_signature = hmac.new(
        secret.encode("utf-8"),
        request_body_string,
        hashlib.sha256,
    ).hexdigest()

    return hmac.compare_digest(computed_signature, request_signature)


@app.route("/", methods=["POST"])
def webhook_handler():
    request_signature = request.headers.get("X-INSCRIBE-SIGNATURE")
    webhook_is_test = request.headers.get("X-INSCRIBE-TEST-MODE") == "true"
    request_body_string = request.get_data()

    # Ensure the request came from Inscribe
    if signature_is_valid(request_body_string, SECRET, request_signature):
        print("VALID SIGNATURE")

        if webhook_is_test:
            # Got a test example webhook, we might log it for example
        else:
            # Not a test webhook
            # Do interesting things with the data in the webhook.
            print(request_body_string)


        return '', 204

    else:
        print("INVALID SIGNATURE")
        # The signature was invalid. We should not trust that the incoming
        # webhook data was sent by Inscribe to the webhook. It may be data
        # sent by a malicious 3rd party actor. Just send back an empty response.

        return '', 204
We can start the local server for this example on port 5000 (the default for Flask) by saving this code as app.py and running the following:
$ flask runWe can then tell ngrok to create a public URL for our local server that we have running on port 5000 with the following command
$ ngrok http 5000
An example ngrok tunnel pointing at port 5000 on localhost
The public URL ngrok gives us can be entered on the webhook settings page and you should start to receive webhooks to our server when the appropriate lifecycle event happens in Inscribe. Using the "Customer Approval Status Changed" webhook type for example we can see notifications come through to the local test server through the ngrok tunnel when customers are approved and rejected.

Example console output of our local server when receiving a webhook
As you can see we were able to receive a webhook payload to our local server using ngrok, verify the signature of the request using the secret key, ensure that it isn't a test webhook and log some information from the payload.
Inscribe's Egress IP Addresses
You may wish to allow-list Inscribe's egress IP addresses for added security:
- 44.226.139.59/32
- 52.35.169.116/32
Updated 4 months ago
